meu mundo mandala
English Translation
Disclaimer - This is NOT my pattern. I Just love it so much I stumbled through the non english version to help figure out the chart I could not read. The YouTube video is here for Part 1 and Part 2 Here (in Dutch?) and her pattern chart is on this site. If the site is no longer working, as may be the case, here is the full pattern chart image.
Materials:
3 mm crochet hook
200g cotton twirl
(I used Lana Grossa Shades of Cotton Linen - Colour Natur/Hellblau/Hellgrau/Grau (704))
or a Scheepies whirl also works great.
stich markers
scissors
Be patient, go slow. Take a good look at the chart and try to understand how the pattern goes. Now if you are like me reading the chart is like a foreign langauge and left you confused. That's when I headed over to the video on YouTube. Starting, stopping, forward, backward, I eventually figured it out but her video did not show all the little steps to take so I started writing this out. It's likely not perfect, I'm new to this so forgive me, but it's a great tool to help follow the chart and video to make your own meu mundo mandala.
Here's a close up of rounds 1 - 10 with and without row indicators. When I had trouble following the rows I printed these images and used a highlighter to follow where I should be going.
Special Stiches
Pico - This is a stich that looks like a P. To Pico you chain 3 and then SLST CH1 and CH3 together.
2-3-2 - This is a combination of 2 DC, CH3, 2 DC into the same space, usually a CH3 space from a previous row.
How to Read
This post is written in US crochet terms with the following shorthand:
SC - single crochet
DC - double crochet
CH SP - chain space
CH - chain
SLST - slip stich
Advice
Check each repeat BEFORE you start another. I had to frog this SO many times because of missed stiches or counting incorrectly. Before each repeat check your work! You will thank yourself later.
The video shows working into the CH stiches but I found doing that led to a looser messier look so I chose to work into the CH spaces. I only work into completed stiches.
Let's get started!
Round 1
Make a magic circle and do 16 SC into it, SLST the first to the last to close, tighten but not too close, I left an opening in the center.
Round 2
CH3, Pico, DC into the same space your chain came from, CH 5, skip a stich
*DC, Pico, DC into the same space, CH 5*
Repeat * to * around until you have one CH 5 space left to complete, do NOT CH5,
CH 2, DC into the top of your starting CH 3 (this makes your CH 5) and leaves you where you need to be to start the next round.
Round 3
Mark the top of the DC from Round 2 as your start.
*CH 9, SC into the center of the CH 5 from round 2*
Repeat * to * and SL ST the last CH 9 into the marked space.
Round 4
CH 1, *4 SC into the CH 9 space from round 3 (mark the first SC as your start), CH 3, skip a chain, 4 SC into the CH 9 space, Pico*
Repeat * to * around and SLST into the marked SC.
Round 5
SLST 4 times then SC into the CH 3 from round 4, mark that SC as your starting point
*CH 13, SC into the center of the CH 3 from round 4*
Repeat * to * around SLST into the marched SC.
Round 6
CH1, *In the CH 13 space from Round 5 do 6 SC (mark the first SC as your start),
CH 3, skip one CH space, 6 SC into the same CH13 space,
CH 3, Pico, CH 7, Pico, Ch 3 (13 Chains with 2 Pico)*
Repeat * to * around, SLST into the top of the marked SC.
Round 7
SLST across the SC stitches and into the first 2 chains of the CH 3 Space, you are now at the center of the CH 3 space from round 6, SC and mark that stich as your start.
*CH 8, SC into the center of the CH 7 space from round 6,
CH 8, SC into the center of the CH 3 space from round 6*
Repeat * to * around, SLST into the marked stitch.
Round 8
SLST into the first chain in the CH8 space from round 7,
CH 3 (Counts as first DC), mark this as your starting chain.
7 DC into the CH 8 SP from round 7, DC in the SC stich, CH 3
*DC in the same stich again, 8 DC into the CH 8 space, CH 3, 8 DC into the next CH 8 SP, DC in the SC stich, CH3*
Repeat * to * around, you will end on a CH 3 that you SLST into the top of your marked starting chain.
Round 9
3 SLST, CH 3, (Counts as first DC), mark this as your starting chain
Your starting CH3 should be in the 4th DC from Round 8.
*DC in next 5 stitches, 2 DC into the CH3 space from round 8, CH 3, 2 DC into the CH 3 space from round 8 (this is a 2-3-2 and will be called that in future rounds), DC into next 6 stiches. You should have 3 DC before your next open chain space.
DC into the CH3 space from Round 8, CH 3, DC in the CH3 space, skip 3 DC and DC into the 4th stich*
Repeat * to * around, you will SLST into the top of your marked starting chain.
Round 10
3 SLST, CH 3, (Counts as first DC), mark this as your starting chain
Your starting CH3 should be in the 4th DC from Round 9.
DC into the next 4 stiches, *2-3-2 in the CH 3 space from round 9, DC in the next 5 stiches (you will leave 3 DC from previous round unworked),
CH 1, 2-3-2 into the CH 3 space from round 9, CH 1, leave 3 DC from previous round unworked, DC into next 5 stiches*
Repeat * to * around, but on the final repeat you will SLST into the top of your marked starting chain after the CH1.
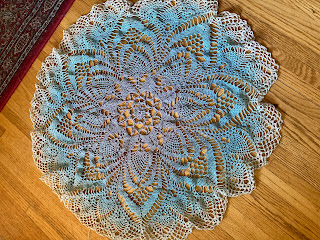
 |
| Here's what you should have after Round 10 |
 |
| Close up of the filet spaces starting to take shape |
 |
| Close up of the center. As you build more and more it flattens out. |
Next week Will be rounds 11 - 20. Crochet along with me. :)


Comments
Post a Comment