Starfish 12 inch Granny Square
 |
 |
 |
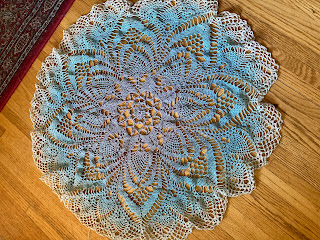
The Starfish Granny Square
This fun square works up fast and is a great way to use up some worsted weight yarn you have laying around. Depending on the look you want you can use 1, 2 or 3 colors to make these squares. The pattern is for 3 colors and indicates where you need to switch colors. Using the suggested hook and weight of yarn you will get a 12 inch square (measured diagonally).
Materials Needed
Worsted Weight (4) yarn in three colors (I used RedHeart brand)
5 mm crochet hook
Scissors
Darning Needle (for the ends)
Stitch Markers (optional)
Stitches Used
Chain = CH
Slip Stitch = SLST
Single Crochet = SC
Half Double Crochet = HDC
Double Crochet =
DC
Front Post Double
Crochet = FPDC
Front Post Double
Trebel = FPDT
Skills to Practice
If you haven’t done front post crochet before I suggest
practicing this stitch a few times before making your final product. The Double Trebel stitch is not as
intimidating as it sounds and it gives this a raised texture that brings the
starfish to life. Finally if you haven’t
carried a color before in a tapestry crochet you will want to practice the best
way to carry the color you are not using.
A tip for switching colors, loop in the next color on the last pull through
to complete your stitch.
Let's Get Crocheting!
This pattern gives you a
12” (measured diagonally) granny square with a raised starfish pattern. You will need three colors of yarn in your
choice. Color 1 (C1) will be your starfish
color. Color 2 (C2) is the background of
your square. Color 3 (C3) is your border
color. I like to use C3 to join all the squares but
as always, it’s up to you, get creative!
This pattern is worked
in rounds. The CH3 counts as a
post/stitch in most rounds. If you are
confused at any point check the picture for reference.
Round 1
Using C1, create your slip knot and CH 4,
SLST into the first chain to create the ring.
CH 3 (this is your first post),
make 11 DC into the Ring,
SLST to the top of the CH3.
|  |
Round 2
Chain 3 in C1, Switch to C2, DC in the same space, DC in
next stich.
*Switch to C1, DC in the same stich, 1 DC in next stich,
switch to C2, DC in the same stich, 1 DC in next stich,*
Repeat * to * until you have 24 posts.
Your last DC should be in C1. SLST into the top of the CH3 to end the
round.
Each stich from R1 will have a DC in each color and you will
have two DC in the same color together all around.
|   |
Round 3
In round 3 we start building the starfish using FPDT crochet into round 1. If
you haven’t done a double treble before, you wrap the yarn around the hook 3
times.
Start by CH3 in C1, FPDT on the first post of round 1 (the
CH3) [marking that with a stitch marker may help if you get confused]
Switch to C2, DC in next 3 stitches
Switch to C1, FPDT on the first post of round 1 behind the
previous FPDT. [see the picture] *DC in
next stich, FPDT on the third post of round 1, Switch to C2, DC in next 3
stitches, Switch to C1, FPDT on the third post of round 1 behind the previous
FPDT*
Repeat * to * on posts 5, 7, 9 and 11 from Round 1
SLST the FPDT to the CH3
|   |
Round 4
CH3 in C1, Switch to C2.
*DC in next 2 stitches, 3 DC in next stitch, DC in next 2
stitches, switch to C1, DC in next stitch, switch to C2*
Repeat * to * to end, SLST to top CH3
You have 48 Posts |  |
Round 5
CH3 in C2, *switch to C1, DC in next stitch, FPDT around the
FPDT in Round 3 to the right of the CH3, FPDT around the FPDT in Round 3 to the
left of the CH3, Switch to C2, DC in the next 7 stitches*
Repeat * to * to end but the last repeat you only
DC in 6 stitches. SLST to CH3
|  |
 | You are now done with C1. You can tie off that color and as you work Round 6 crochet over the end of C1 so you don’t have to sew it in later. At this point you should have a circle with a starfish in C1. Now we will turn this circle into a square! |
Round 6
To help with keeping track of where you are put a stitch marker in your first SC.
Working in C2 only, CH1, SC in same space, SC in next 2 stitches, *HDC in next, DC in next, CH8, skip two stitches, DC in next, HDC, in next, SC in next 9 stitches* Repeat * to * two times
HDC in next, DC in next, CH8, skip two stitches, DC in next,
HDC, in next, SC in next 6
SLST in first SC
|  |
Round 7
To help with keeping track of where you are put a stitch marker in your first DC.
Chain 3, DC in next 5 stitches,
*Do 5 DC in the chain space,
CH3, 5 more DC in the chain space, DC in next 13 stitches*
Repeat * to * two times
You have 4 small chain spaces with 23 stitches between each |  |
Round 8To help with keeping track of where you are put a stitch marker in your first DC.Chain 3, DC in next, FPDC in next, alternate every other to the corner chain space. *2 DC in the chain space, CH3, 2 DC in Chain Space. FPDC in next, DC in next, alternate every other to the corner chain space* Repeat * to * until you are all the way around. SLST to first DC. Tie off C2 and cut your yarn leaving a tail to sew over or weave in. You have 4 small chain spaces with 27 stitches between each |  |
Round 9This round is a finishing edge. Depending on how you want to connect your squares you could skip this round. I like using it as it defines the square shape even more.In C3, SC in each stich around the square doing 5 SC in each corner chain space. Tie off C3 and cut your yarn leaving a tail to weave in. |  |

Comments
Post a Comment